Boot Pistol Holster
I picked up a small piece of 6-7 oz leather at the Tandy store in Phoenix. Here are some pictures of an attempt to make a holster for the #3 boot pistol.
Not decided what to do with the small blank area of the back strap showing. Maybe some more designs there along with my initials and date. Top strap has a snap and rivet, lower strap is only riveted.
A Nicer Holster, 8-9oz leather, Charcoal Black ECO-FLO dye, 1/2 inch roller buckle. Room for half-cocked hammer.
IdeZilla
Comments appreciated.
Monday, April 14, 2014
Wednesday, April 2, 2014
Three Boot Pistols, .31 caliber
Here are a couple of really crude boot pistols. Both use pieces of a single Enfield DP .303 barrel.
Pistol #2
This one is the second of this series, it came out a bit better than the first one.
The barrel takes a .310 round ball without a patch. I have found some .315 round balls at Cabela's.
Yup, it is a bit small. Frame is 1/2 inch square tubing. Barrel is the last piece, the front. Lock is patterned after a very popular lock style. Nipple is a bit tall and may get replaced with a revolver type of nipple.
Left side of #2.
Cherry Stock, unfinished. No sights, yet. Trigger surface has been polished for a nice pull.
Left side of the lock. No half-cock, yet. Shows the trigger spring which is captive by short holes in the trigger and frame. Hammer head is left large until the barrel is attached. The hammer head will soon be shrunk and the tail may get curled up. A 6-32 button head screw holds the hammer spring to the frame. Hammer and trigger are from 3/16 inch thick stock.
Rear, angled view of the right side.
Added: Front sight, other part of that 5cents, LIBERTY * 1964
Added: Flash cup on hammer, .308 win brass.
APR/04/2014
New Walnut Grip.
Range Report 4/4/2014
.310 round ball, 30gr of 777 FFFg,
no patch, 11 meters. No rear sight.
At least it hit the target!
Pistol #1
Walnut burl for the grip. Longer barrel, the middle piece, still .303 Enfield.
Lock, with hammer cup, 10mm Brass.
5cents, 1964, Nose & Chin.
At rest.
Half cock.
Full cock.
Added: Brass face to the trigger, rear sight.
Barrel now riveted with 3/16 inch rod.
Added: #3 in a "family" shot.
It is a .40 cal smooth bore. Barrel is a Carcano piece drilled to .395 inches. Ramrod has .223 brass case as a tip.
Grip is Walnut Burl.
Range Report from May/07/2014
11M, .375 RB, 15gr of 777 FFFg, Red Ticking Patch lubed with Bore Butter.
Since there is no rear sight, it hit a bit to the right, need to fix that.
IdeZilla
Comments appreciated.
Thursday, February 13, 2014
Rear Sight Changed
Feb/13/2014
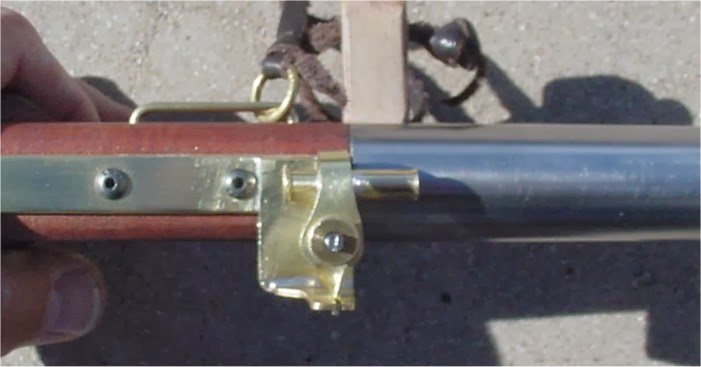
The rear sight has been changed to this newer one.
The old sight was removed from the top brass strip and replaced with this one. This sight is a bit fragile and this pistol will need it's own storage case for protection.
Each 1/4 turn of the thumb nut moves the sight tube up or down 0.0078125 inch.
Close up from the left side.
Base was modified to allow further downward movement (notched) to simulate the older sight tube. The base was then soft soldered to the top strip.
Right side view.
Top view.
The screw slot on the left is oval to allow for windage adjustments.
How it looks to the shooter.
Everything is in alignment vertically but the may not be.(Maybe it is now)
What you cannot see is that the top brass strip is adjustable for windage. There is a small "notch" that matches at the back of the frame and brass piece.
IdeZilla
Comments are welcomed.
Tuesday, February 11, 2014
Prototype Rear Sights
I started playing with some pieces of brass tubing and 22MAG brass.
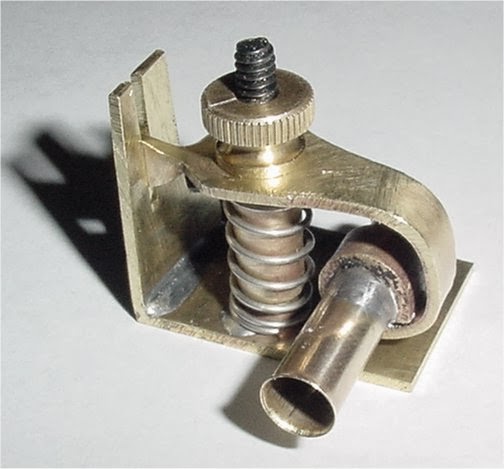
I came up with this rear type of sight with elevation only.
Brass tubing attached to the base with a 6-32 US thread screw in the center.
A spring surrounds that base tube and pushes up on the slider tube.
The slider can move up or down about 1/4 inch.
The thumb nut pushes the slider down against the spring, hopefully holding it in place.
The loop keeps the 22MAG peep tube pointing forward.
Left Side, Full Up Position.


Left Side, Full Down Position
Left Rear, Full Down Position

Left Rear, Full Up Position
Rear View, through the 22MAG case, as a rear peep sight.
Pulling down on the slider spring shows the inner base tube.
IdeZilla
Reminds me of Steam Punk stuff.
Feb/12/2014
Here is another one, this is fun.
This sight has been designed to fit at the rear of "Underhammer Pistol, in progress".
Rear View.
It needs a lot of cleaning and polishing, it is rough.
Slider is positioned a bit higher, near the top of movement.
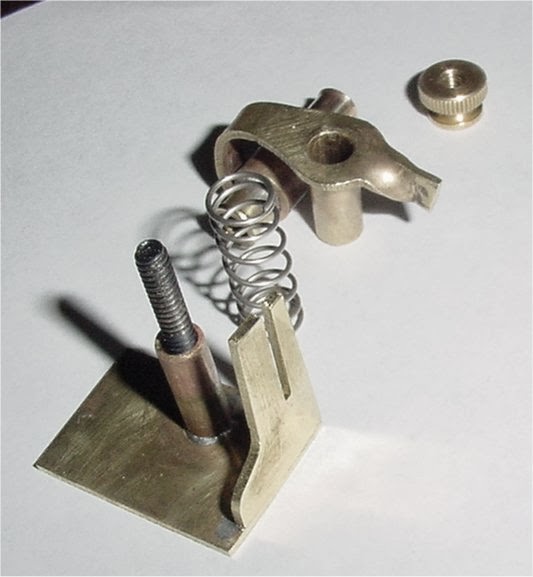
Here are the pieces.
Sight tube is a 22MAG brass that was picked up at the shooting range. Screw is 6-32 US thread.
Slider tube is larger than base tube. Base tube and slider tubes are soldered with low temperature silver plumbers solder, the rest with soft solder. Spring came from an assortment box from the hardware store.
The reason for the curly sight tube arm is for small bending amounts to align this sight tube to the front sight.
Front - Left Side View.
Sight tube is almost at the bottom of its movement.
Rear - Left Side View.
There is room for tick marks on the outside of the slide guide panel.
Feb/15/2014
Here is number three, this should be all for a while.
Rear View.
Front View.
Sept/9/2014
#4
.22 MAG brass for sight tube.
6-32 US screw for adjustment.
IdeZilla
Comments are welcomed.
I came up with this rear type of sight with elevation only.
Brass tubing attached to the base with a 6-32 US thread screw in the center.
A spring surrounds that base tube and pushes up on the slider tube.
The slider can move up or down about 1/4 inch.
The thumb nut pushes the slider down against the spring, hopefully holding it in place.
The loop keeps the 22MAG peep tube pointing forward.
Left Side, Full Up Position.


Left Side, Full Down Position
Left Rear, Full Down Position

Left Rear, Full Up Position
Rear View, through the 22MAG case, as a rear peep sight.
Pulling down on the slider spring shows the inner base tube.
IdeZilla
Reminds me of Steam Punk stuff.
Feb/12/2014
Here is another one, this is fun.
This sight has been designed to fit at the rear of "Underhammer Pistol, in progress".
Rear View.
It needs a lot of cleaning and polishing, it is rough.
Slider is positioned a bit higher, near the top of movement.
Here are the pieces.
Sight tube is a 22MAG brass that was picked up at the shooting range. Screw is 6-32 US thread.
Slider tube is larger than base tube. Base tube and slider tubes are soldered with low temperature silver plumbers solder, the rest with soft solder. Spring came from an assortment box from the hardware store.
The reason for the curly sight tube arm is for small bending amounts to align this sight tube to the front sight.
Front - Left Side View.
Sight tube is almost at the bottom of its movement.
Rear - Left Side View.
There is room for tick marks on the outside of the slide guide panel.
Feb/15/2014
Here is number three, this should be all for a while.
Rear View.
Front View.
Sept/9/2014
#4
.22 MAG brass for sight tube.
6-32 US screw for adjustment.
IdeZilla
Comments are welcomed.
Thursday, February 6, 2014
Brass Rear Sight Up Close
Here is that brass rear sight up close.
Not much text just pictures.
Yes, the tang is removable.
All Pieces.
Lead (63/37) Soldered to tang.
Slider guides are soldered to sight frame.
6-32 US screw.
Solder showing on the rear frame guide.
Screw flush with rear of sight frame
Solder showing on the two frame guides.
Slight dovetail on rear sight guide.
Sliding piece
Slight dovetail on sliding piece
Approximately 90 degrees for slider
Approximately 90 degrees for frame
Thumb Nut and Washer exert pressure on slider holding it into the rear dovetail. Thumb Nut purchased at hardware store.
Sight to stock clearance.
IdeZilla, Feb/6/2014
Comments Welcomed.
Subscribe to:
Comments (Atom)


