Small Bore, with range reports.
Stock shape taken from a childs .22 bolt action rifle, a Stevens Model 15, then modified to fit.
Brass pieces left over from a H&A Spanish rifle, butt, trigger guard, etc.
Cherry, 2 inches thick, a bit soft but seems to work OK.
During a rain storm today, got most of the barrel inlet. Some of you will recognize the barrel brand, about 18 inches long of what's left. Barrel chamber stub removed, flat filed on right side for a flintlock, yes that one. Now breached at 3/8-16. If this barrel does not work out then it can be bored out for a bit larger bore smoothie.
Aug/10/2016
Butt Plate installed. More shaping done but not finished.
Trigger guard modified to fit this stock.
Barrel plugged. Now for a hook breech tang, would be nice if it was brass but may end up as steel.
Aug/12/2016
Went to the local metal store, AZ-Metals. Bought a foot of 2x3x0.188 angle steel. Turns out it's ASTM A36, whatever that is. I also had them cut a 1 inch wide piece from that foot long. After about 1 hour I had what you now see. Top corners of the tang need trimming, also the tang needs a "bit" of bending.
It is going to be over 100F today and the shed gets too hot to work out there for more than 1-2 hours. My do-rag hanky is hanging in the bathroom curtain rod trying to dry out.
It is too bad that the barrel looks like a 10-22, argh.
OK, thanks to an idea by Tim Crosby on the AmericanLongRifles forum, I now have a touch hole insert. Stainless 1/4-20 and 1/4 inch long allen set screw inserted backwards, with a 1/16 inch diameter hole drilled through it. Set screw probably needs to be a bit longer as this one only gave 4.5 full threads out of 7 threads available in the barrel.
Shown here is the hook breech partly installed with temporary screws into the Cherry stock. Now for a barrel band or a wedge to hold the front of the barrel down.
Aug/13/2016
Pinned the barrel front.
Folded brass soldered to the barrel. Pinned with 3/32 inch wire (old coat hanger).
Lock comes next.
Aug/16/2016
Lock in.
Barrel in.
Trigger in.
Trigger guard on.
Flint in.
Sparks made.
Simulated left side plate.
To do:
Test Fire.
Walnut stock nose.
Side Plate.
Aug/17/2016
Beginnings of the side plate. Still a bit large.
Side plate hammered from the backside to "round it out".
Range Report:
Aug/20/2016
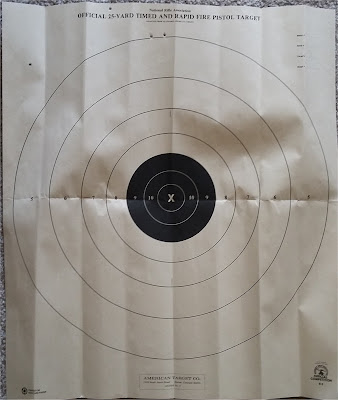
25 yards, 10grains of Goex FFFg, prime was Schuetzen FFFg, 0.22 caliber air gun pellets that I found at the range on the ground.
Large Target
Four hits upper area, about 10 to 11 inches high from the POA at dead center of the target.
Closer View:
During the fourth shot, it would not spark at all (argh). I changed the flint, not needed but it had to go off so that the public range could go cold. After about three more tries it finally went poof. That darned frizzen again. Time for a new one.
New frizzen ordered on flea-bay.
Notes:
I don't care about speed of the bullet, just that this rifle functions. Since it's my first hand-made flinter I am happy with it as is. The choice of wood is not good, this piece of Cherry is way too soft for a rifle stock, it keeps cracking and the sharp edges keep flaking away, disappointing.
Aug/22/2016
Ordered NAA black powder bullets today, 100 each. These are made for their NAA black powder .22 revolver and they should work fine in this rifle.
Made a tool to concave the backend of pulled .22 bullets. Lots of mis-fired ones at the range.
Aug/23/2016
Blued the tang, changed screws, etc. Length is 33.5 inches long, that's all, butt to muzzle.
33.5 inches long. Camera angle shows it all wrong.
Questions about the ramrod used; what? materials?
Core of the ramrod is steel of 0.156 inch or 5/32 inch diameter, outer is 0.187 or 3/16 inch hobby brass tubing, then a .22 caliber jag, all soldered together into one solid piece, jag end up against the steel rod. Jag is permanent.
Stainless rod with a brass brush for .22 cal, used after every shot.
Range Report: Aug/31/2016
Was able to get 16 shots before it got too hot at the range (AZ). Shoots a bit high. The barrel is so-so, either it's me or the barrel is not
good for muzzle loading applications, too fast of a spin. Groups of 2 to 3 inches at 25
yards seem to be normal. This grouping is with 10gr of Goex FFFG, NAA
bullets and some or no lube. Cleaning with a brass brush after each
shot seems to be required. Using less than 10gr of Goex doesn't seem to help accuracy. It's a bit of a pain to load 10gr of BP from a large horn, spilling more than used.
The lock works fine if the flint is kept right up against the frizzen at half-cock. Once it wears down the lock starts to not spark. I can work with that. Frizzen spring seems to work fine.
The touch hole liner as it exists works fine, amazing.
Sept/08/2016
Range time today.
Have reduced the main charge to 7gr of Goex FFFg. Groups seem smaller.
Will be picking up a can of Goex FFFFg for testing, someday.
Keeping the flint up close to the frizzen and sharp, works. This lock is a flint eater, bummer.
Sept/15/2016
Range Report:
Benchrest at 25 yards, 7.5gr of Goex FFFg, no patches.
That 7.5gr is estimated by moving the marker to halfway between 5 and 10 on the brass powder measure.
All holes are those NAA BP bullets, except one.
The single hole just to the left of the "X" is a round-nose air-gun pellet of unknown weight and manufacture.
I talked to one of the air-gun fellas at the range, he suggested to try some JSB 18gr air-gun pellets of which he let me have three. The three holes to the targets left are those pellets. The three holes on the right are 14.3gr pellets. Same distance, same powder charge, no changes.
I rezsized the pellets through another 10-22 barrel before trying to push them down the muzzle of this rifle. That helped to keep the pellet skirts intact and correctly sized.
When I got home I moved the trigger pivot to the new location shown by the shiney pin showing just under the rear lock screw. Now the trigger pull is around 3 lbs instead of what it was and terrible it was! Trigger was flattened a bit to accomodate the internal vertical move. Plug that old hole!
Sept/21/2016
Removed broken rear sight and replaced it with a 1/16 inch diameter brass peep sight.
The peep hole has been countersunk on both sides to reduce internal reflections from the AZ sunshine.
Sept/22/2016
Some embelishment on the lock plate.
Frizzen spring finished, now locks the frizzen open.
Oh look, another one:
https://youtu.be/rFfsBZURIdQ
Building an iron flintlock lock:
http://americanlongrifles.org/forum/index.php?topic=26825.0
IdeZilla
Comments Welcomed
Tuesday, August 9, 2016
Monday, August 1, 2016
Making a Flintlock Lock from the parts bin
I will be using various parts from the parts bin to create this lock.
Internals from a H&A percussion lock; main spring, tumbler, sear, sear spring, screws, etc.
H&A plate will be put back into the bin.
Hammer/Cock is from a TC flintlock, old style.
Plate will be hand-made from 1/8 inch thick steel plate from the hardware store.
Frizzen from old style TC flintlock, relined, not shown.
Update 1: Aug/02/2016; All parts mounted (so far)
Update 2: Aug/04/2016; Top Jaw
Update 2: Aug/05/2016; Pan, Frizzen, Frizzen spring.
Update 2: Aug/06/2016;Clean Up, fix that frizzen!
Parts to make or purchase:
Upper cock piece.
Upper cock piece screw.
Pan.
Frizzen spring and screws.
Parts to work over:
Cock:
Needs the square hole moved or rotated, the lower jaw moved upwards (taller).
Most of the current parts
Will need another screw for the sear spring, the flat head one is temporary.
"New plate" holes marked. Tumbler hole is done. Plate outline is a bit larger, about 1/16 inch or so even though the pictures makes it look shorter, etc.
I realize that these parts are not very good but this lock making/creating is for teaching purposes.
Other side of those plates. Pin is for the upper leg of the main spring. Rear slot is for the sear spring.
There are three threaded holes for lock mounting, these will not be copied to the new plate. New locations will be made when the lock is to be installed.
Aug/02/2016 Update:
Mounted all internal parts.
The screws are 3mm x 0,5mm so a tap was purchased, the store did not have a #39 drill, so I used a #40.
I attempted to hot bend the cock but as you can see a crack appeared anyway. The lower jaw was tilted downward a tiny bit. It appears that the jaw screw may be 3/16 x 24 US, check that later. That jaw screw is either 3/16 x 24 or 12 x 24, both work.
The one allen screw replaces another screw, it holds the sear spring in place. The main spring pin is coat-hanger wire.
Now to find or make the pan, probably brass. Also the frizzen spring.
Aug/04/2016 Update:
Finished the upper jaw and fire-blued same.
Cheesy screw (that is all that the local Ace had), 12x24. Turned the head to a smaller diameter to fit, drill press + file.
Started a frizzen spring, it may be too weak, but we'll see later. This frizzen is one that was a bugger to harden so it was refaced with a piece of file. That file piece was removed and another attempt to harden that frizzen using a compound.
Now for the pan and bolster.
Aug/05/2016 Update:
Pan added, not the way I wanted but ugly and functional.
Not sure if this pan metal is brass or bronze. I purchased a large piece 3/16 inch thick for under $4, enough to make another pan.
Pan and notch to fit that pan.
Notch in bottom of pan.
Pan added. It does not spark as the frizzen is still too soft, bummer. The Map torch just does not get hot enough. I think I'll rivet on a new face.
Backside.. One 6-32 screw holds pan on along with that frizzen screw.
Frizzen spring mounted. I did get a very few sparks from this frizzen, about half of the time.
Lock still needs a lot of finish work and detailing, but it seems to work.
Update 2: Aug/06/2016;Clean Up, fix that frizzen!
Frizzen: Did one more "Red Cherry" application then re-heated (from the back of the frizzen face) that frizzen to orange and did a water plunge. Finally, sparks, not a lot but enough.
Added pan piece, soldered with plumbers solder.
The flint (white chert) hit on the frizzen shows first hit then a gap then more hitting. It may be that the frizzen spring is too weak. Also who knows how long the frizzen will spark, probably depends on how deep the treatment went.
The flint is a bit short.
That frizzen spring broke itself into two pieces by lounging on the coffee table. A new one has been made.
Aug/24/2016
New frizzen spring made.
Tried to reline old frizzen with a section of old hand saw blade, riveted on, then full tempered not drawn back. Seemed to work OK with Arkansas chert (white). Did not try another type of flint. I will save this frizzen for "emergencies".
Fleabay frizzen showed up and was installed. That chert did not work too well. So I tried a dark colored French type flint, more sparks (whew).
Aug/25/2016
The removable pan seems to get forced up at the front due to frizzen spring pressure. My decision may be to permanently solder the pan to the backing plate. This probably will help in stopping the binding of the frizzen pivot screw, etc.
...
Done. Pan is now permanent.
Aug/31/2016:
If the flint is kept at or touching the frizzen (half-cock) then the lock sparks fine, main charge goes off everytime. When the flint wears down this lock tends to skip sparking. Checking that spacing every once in a while does help. The trigger pull is still quite stiff even though the fill-cock notch seems to be angled correctly. Maybe another trigger pinning location would help.
IdeZilla
Comments Welcomed.
Friday, July 22, 2016
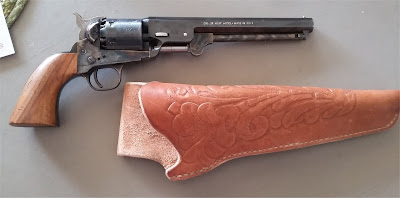
Holster for that Spesco/DGG Revolver
July/22/2016
Holster Making, two days.
Decided to make a holster for that 2 in 1 Spesco/DGG revolver.
Heavy leather. Hand Stitched.
This one will be a tight fit and very useful.
May add two holes at the muzzle end for a leg tie-down, for looks.
Dated: PTB '16.
I hate the drilling of the stitching holes as the backside comes out rather crooked, bummer. Drill is 1/16 inch diameter.
Top Edge
Size of belt loop.
Thickness of the leather in the trigger guard area, 2X. Doubled stitched for the length of that swell, that was fun.
Both, Frontside
Both, Backside
The wedge sticks out as far as the cylinder, on this side. Extra long for additional adjustments in the future.
July/24/2016
Yesterday, this holster was "colored".
Natural for the "flower".
ECO Nut Brown for the outlining (hand painted) and same color for the rubbing.
Red is actually Orange Sharpie.
Finished with ECO sheen.
Seems popular to the locals.
Thanks for viewing!
IdeZilla
Comments Welcomed
Tuesday, July 12, 2016
Powder Horn No. 2
Powder Horn No.2
I picked up this horn at an A.J., AZ. flea market, $5 OTD.
Carved an actual size plug from Walnut Burl, not round.
Outside curve of the resulting horn is 12 - 1/8 inches long.
Tip of the horn which was removed is about 2 inches long (not shown).
Short MP4 of the horn, poor quality.
July/15/2016
Better Pictures
Horn as of today. Chrome-tanned leather strap about 5/8 inch wide.
Big End.
Walnut Burl, Reformed Nail Staple, Vio Plug. Fake brass nails. Plug shaped to fit horn opening, not round.
Staple was formerly a nail, flattened, bent, nicked with hammer and cold chisel for wood+glue attachment.
Business End
Walnut plug, Steel Ring, soldered.
Filler Hole.
Initials and year scratched in with 3/32 inch diameter broken drill bit kept in a H.F. pin vise.
IdeZilla
Comments Welcomed
Wednesday, May 18, 2016
Muley Side Lock
A Muley Side Lock, hand made.
Mule Lock with trigger attached.
Tails on the trigger and sear have no function, but are reserved for adding springs.
Hammer is left very rough until the lock is installed and the nipple position/distance is found.
Hammer pivot blocks are just soft-soldered for testing. Will be riveted eventually.
Mounting plate is about 4 inches long and about 1-1/8 inches high.
Trigger pin and hammer pin both are 1/8 inch diameter.
Full-cock sear not pictured here (not made yet).
Trigger with black Sharpie to show wear point.
Shown with the half-cock/trigger in place as half-cock.
Ditto
Showing fired position, half-cock out of the way.
Full-cock sear in place. Half-cock in position.
Trigger pin in the sear slot is brass 3/32 inch diameter. It was time consuming to file out that slot.
The block above the trigger/sear tails is supposed to be for coil springs.
It will probably be removed (done). For now it is a trigger/sear stop.
Full-cock, both in position
Fired Position, both out of the way. Trigger pin pulls the sear back in tandem.
Trigger Springs Added.
May/05/2016.
Springs fit into split tails of each moveable piece.
A 4-40 screw holds the springs to the face plate.
Story: the 4-40 tap broke halfway through the screw hole.
This worked out OK as the screw is now stopped by the lack of threads.
Another hooked pin (nail) holds the spring tails in place.
A pin (nail) is now the trigger/sear stop.
Full-cock.
Note the riveted hammer pivot blocks.
Finishing nails, heads at this end, peened on the face side, #42 drill size.
Fired. (Bang)
Half-cock for capping
Face View.
Very crooked date stamping as a serial number, 05022016.
Hammer Spring added:
Big and ugly but it works great, maybe too strong.
Made from old hand saw blade.
Hammer spring held in place at the rear by an rectangled 8-32 round head black screw.
Peened at the backside.
May/09/2016
Started stocking a previously percussion .45 cal H&A Spanish barrel into the Cherry stock.
Drilled the depth down the center line.
Carved some with a pocket knife.
Barrel laying in the partial inlet.
Old percussion tapped hole is 5/16 x 24 TPI (in inches).
Barrel filler is left over from being in a rifle.
May/10/2016
Started stocking the pile of parts. Lots more to do here.
.45 cal H&A barrel. 11-1/2 inches long, cut from a partly ruined rifle barrel.
So far that is all of the parts. Lock needs to go deeper as it is too far away.
Hammer gets bent up a bit.
May/12/2016
Lock in the general location but will be about 1/4 inch deeper.
Hammer shaped to hit the proposed nipple.
Nipple will be 5/16-24 thread, #11 cap, from TOTW.
Lock with reshaped trigger, offset to be about the center of the stock.
Trigger forward movement stop pin added, a finishing nail, soldered.
May/13/2016, Friday and a half moon.
Started shaping the stock. Removed about 1/4 inch from both sides except around the lock.
Lock has been inlet farther down into the stock.
Barrel needs a tang welded onto the plug.
A 5/16-24 nipple has been ordered from TOTW.
Good, because I did not want to shorten the barrel also make and fit a new plug just because the nipples I have are in 1/4-28.
May/14/2016
Removed more wood from each side.
More wood can be removed around the lock.
Ramrod? Maybe.
Lock Mounted. 8-32 through bolt, #6 brass wood screw rear.
I will be filling in the trigger wood gap.
Brass trigger guard coming.
Temporary 8-32 lock bolt and brass washer.
May/18/2016
Hammer resting a new TOTW nipple (MRS-S) that came in today, 5/16-24 threads for a Springfield rifle, but works great here.
Fits right into the threaded hole that was there.
Barrel has a tang, barrel needs a tang screw and barrel lug.
Selection of sights has not been determined.
May/19/2016
I was going to take this pistol to the range today (May/20/2016) but it got left at home accidentally. :-(
Reduced the lock outline.
Re-curved the tang so that it lays down properly.
Added barrel front pin and tang screw.
A temporary nail headed pin, visible on this side.
Temporary until a piece of wire is found with the correct diameter.
Rounded the stock nose.
Lock bolt washer sunk into the stock.
Oblique view
Hammer reshaped.
One coat of low gloss tung-oil finish.
May/22/2016
Off to the range.
The main spring seems a slight bit weak. If the cap was not fully down on the nipple, it would not shoot.
That spring will be stiffened, probably tonorrow.
Maybe add sights too.
May/23/2016
Cleaned up the tang a bit.
Flattened out the hammer spring and retempered it. It should be much stronger for a while anyways.
May/25/2016
Added: trigger guard, trigger face, sights.
Trigger guard out of brass sheet.
Front sight soldered, folded brass, from 7.62x54 brass flattened.
Rear sight inlet into barrel then bent up and in.
Trigger face, brass sheet, soft-solder.
Guard screws will be replaced with slotted oval head brass.
Shooters View.
June/03/2016
Range Report:
25 yds, 30gr of Goex FFFg, 0.490 hand cast RB, Ticking patch, spit lube.
Started with the first shot way down at about 5 o'clock. After finding out where it shoots, slowly worked up to the middle XX hits. I have moved the rear sight to hopefully center the hits as the front sight is soldered on and does not move.
It definitely needs a hammer or nipple cup because I received several cap fragment hits on my fingers, bloody.
Also I must mind my grip, choking up on the grip is not good as the recoil forces that hammer spring into my index finger. I may modify the stock so that it isn't so smooth on the grip area.
June/14/2016
Added a Flash Cup to the Barrel.
July/08/2016
Fake iron welded barrel patterning done with common yellow mustard. Probably needs a couple more applications.
July/24/2016
Slap-Dash Holster.
IdeZilla
Comments Welcomed
Subscribe to:
Posts (Atom)