Wednesday, January 22, 2014

BHP #6 Upgraded, UnderHammer.

Here is one of the first rifles I made that used to be on www.garagegunsmithing.com (a dead site, too bad)
It consists of a DOM (Drawn Over Mandrel, no welds or seams) 1 inch barrel with a .50 inch bore.
Barrel Cost is about $1 US per inch.
A walnut stock, a free reject, from a website that sells better ones for $35.00 US.


Underhammer action with a floating trigger guard which is only held at the rear, behind the trigger.
Shown at half-cock.
Scope is 32x4, inexpensive of course.
This smooth bore barrel is surprisingly accurate, hits whatever you aim at.
Front wood stock is held in place (by friction) with two brass bands having two screws at the bottom face through the wood.


A closer view.


How the scope rail is mounted, on two separate blocks soldered to the barrel. Barrel is held in place with those two 10-32 US thread button-head screws right behind the barrel.  I suppose that if another caliber was wanted the barrel could be removed and replaced.


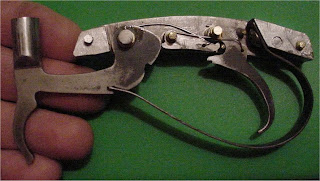
A closer view of the trigger guard. The action is a teeter-totter type, a separate sear. Those two visible stock screws (top right edge of picture) also hold the trigger guard in place.  Somehow the camera reports the trigger as rusted, not true.

IdeZilla


Feb/20/2014
25 yds, .490 RB, 50gr FFFg (777), blue ticking patch.
Top target was for sighting the scope.  Bottom target was for testing the scope.


IdeZilla

Comments Welcomed

Thursday, December 12, 2013

Parts and Pieces

This one is made up of stuff left over, parts and pieces.


Lock and barrel are from an old H&A kit rifle.  The barrel stub is the back 1/3 of that same rifle and is .45 cal.  Originally the lock was very stiff and gritty.  After polishing the insides of the lock, lock plate and the sear nose it now works very nicely, trigger pull has been greatly reduced.  Stock is soft Cherry.  Trigger is original but reshaped.  The dovetail there was for the rear rifle sight but may get filled in. A brass pin holds the barrel in front through an original staple.  Tang is soft-silver soldered (plumbing silver bearing solder) to the plug.

This project is not finished and has parts coming in from Track-of-the-wolf.com, the drum and drum installing kit.  The drum will be 5/16 inch x 24 US threads. Barrel is 11 and 1/2 inches long.  The lock plate does not support the drum and may get metal added (welded) for that support.  Front lock screw passes under the barrel leaving room for a ramrod slot.

Left side.
I am not sure how to finish the stock nose. I do have plenty of Walnut scraps for color contrast.


Trigger guard by the grip. Guard is made from brass strip, which was tempered, shaped and then hammered to harden it. Three brass screws ( #5 x 1/2 inch ) hold the trigger guard in place.


Shows the trigger hole.  Rear lock screw threads were added as the original rear mounting hole is just behind the hammer and cannot be used, the barrel is in the way.


 H&A stamped, no tumbler fly.


Tang, 0.25 inch thick soft steel, 0.6 inches wide.  Brass wood screw, the much used bench one, not for final usage.


Since this is my first side lock project, things like this picture happen. The lock should have been raised in the rear a bit higher, too late now.


IdeZilla

idezilla * at ! yahoo # dot $ com


12/13/2013
The drum is installed.  It came in the mail today, one day early as usual.
A popped cap is in the background. Yay!

I used the drum/nipple tool from Track of the Wolf.com to correctly angle the nipple and horizontal position (away from the barrel).  The tool was modified or narrowed on the backside about 3/32 inch to help move the nipple closer to the barrel.  Now metal must be added to the lock plate to support the drum and keep it from breaking away from the barrel.  The wood is not strong enough to support the drum every time the hammer comes pounding downward.  Nipple is 1/4-28 US thread or #11 cap size.


IdeZilla


Now back to further shaping the stock.

Range Report, Dec 18, 2013

It is shooting about 4 inches to the left, my POA was at the right edge of the black, centered vertically.  Since there isn't a rear sight yet, I guessed where to aim.  Load is 30gr of 777 FFFg, 11m (~12 yards to US folks) .440 RB, blue pillow ticking patch (~0.017 inch thick). Nice barrel. I need to find someone with a lathe to cut the muzzle square to the bore.

Oh, yes a spent .22LR case holds the hammer up to air out the barrel after cleaning.

Stock partly colored with brown shoe polish.

A piece of 3/8 inch key stock has been silver soldered to the lock plate to hold the drum in place and keep it from breaking.

IdeZilla


Friday, December 6, 2013

A Prototype UnderHammer Lock; More.

More pictures about that prototype lock.
Now installed into "The Frontier" pistol.

Here it is just like before, with new sear spring and hammer extension. The hammer extension will be shortened at installation.


Shown with new cover plate, held in alignment by two pins, one at each end.


 Hammer spacers are 22LR empty brass. sear and trigger spacers are aluminum and brass.

Since this picture was taken, all three pivots have full width brass sleeves installed to keep all parts centered.


Front alignment pin goes all the way through while the rear pin is only part way.

Trigger (at the tip) moves about 1/4 inch to unlock. You cannot tell when it is going to release, very nice.

Sear spring partly visible, below.
Hammer head has been shortened.

IdeZilla

Comments Welcomed


Tuesday, December 3, 2013

Two more leather bags


Both bags are leather and hand stitched with matching leather lacing.  Small bag is 7 inches wide and 8 inches tall. Both have woven fabric adjustable straps and tubular pockets on the right sides.

Back side picture show the one piece back & flap, also how the straps are attached.

Next shows left edge of small bag.

Last shows insides of both bags, standing up, bracing each other. Two pockets, rear one is narrow at the bottom, front one full is size inside.

IdeZilla

For sale.


IdeZilla

Comments Welcomed

More Bags Here.


Wednesday, November 13, 2013

A Prototype UnderHammer Lock

This is another type of underhammer lock.
It is similar to others that have been used with some slight differences.
Springs have not been inserted.
Now installed into "The Frontier" pistol.

Lock is steel, common 1/8 inch thick plate, for testing the design. Rear two pins are 1/8 inch brass while the front pin is 0.203 inch diameter steel from my scrap pile.


The close up shows the hammer in full cock position with the sear being held by the trigger. No springs are shown yet. Pushing up on the hammer holds the lock tightly together. While pulling the trigger it is noted that there is very little force applied to the trigger by the sear. I note that the sear+trigger connection is visible outside of the lock, remember this is just a prototype. Normally the trigger and sear pins would be higher up hiding both.


This picture shows the hammer down, sear released, trigger pulled. The sear does not need to move more that pictured to release the hammer. Yes, the trigger shape is ugly and it will most likely be shortened.


The close up of the hammer down, etc. Red marker pen on the hammer shows the hammer and sear are not touching.

Lock serial number can be: P11132013.


Here are three more pictures, with springs.
Action at full cock, hammer spring under full tension. Trigger pull is nice and smooth.
Hammer spring is cut from an old rusty hand saw blade, tempered first.
Main spring block; 8-32 tap, soft soldered to back frame, it will be riveted later.
 The brass washers are temporary, used to space the parts up away from the frame and to have the hammer spring centered.

Trigger was reshaped.
Trigger spring is shaped like an "L". Sear spring is shaped like a "V".

As the trigger is pulled the rear of the sear moves down just a tiny amount. This should keep it locked if it gets dropped ;-)

There is some temporary brass tubing over the trigger and sear posts to hold the 2 springs in position.


IdeZilla

Comments Appreciated.

Friday, November 8, 2013

Shootable, but not finished

Yes, the stock is bulky, this is my preference. The barrel has a tang and is pinned.
1/8 inch diameter brass pin through the stock and the barrel lug. The lug is soldered to the barrel with low temperature silver bearing high strength plumbing solder.

Visible are the two barrel rear sight holes. Stock needs a nose cap. I have some Walnut pieces that would work nicely.


Here is that tang, tapered, flat, plain but sturdy. Plenty of room for a tang peep sight.


Action inlet and capping notch.


Now to tap the barrel for front and rear sights. Then off to the shooting range.


Rear and front sights added. Barrels pre-drilled holes were tapped 6-48 US. Taps came from Track-of-the-Wolf (.com)

Apologies for  fuzzy pictures (old cell phone camera).


Have not tried these sights. They are temporary to see how it shoots.


Walnut stock front cap, added; Nov/18/2013


Nov/19/2013
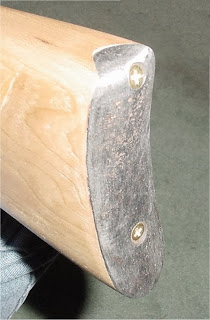
Old rusty military steel butt plate, formed (hammered profusely) to fit curve of stock then inlet.
How it looks today


Nov/20/2013
Brass flash cup added.


July/10/2016
Range time today.  Shoots great.  Used mattress ticking with a 0.440 inch RB, water lube.
Looks like this one will get lower front and (hopefully adjustable) rear sights.
Possibly add a hammer cup to keep those cap fragments away from my left forearm. (ouch).


IdeZilla

Comments appreciated.

Friday, November 1, 2013

Rifle Lock

A lock is mounted, a different lock. It comes from an unused pistol. This action is very smooth and works great. There was no happiness trying to make another lock design that was smooth and had an easy trigger pull.

Shown is half-cock. The barrel is inlet and has no tang and the tang will be added later. Possible the stock will have barrel bands instead of pins or wedges. Since the barrel is probably stainless steel it would be difficult to solder pin or wedge lugs to it.


Here is that lock with full-cock notch. Notice that this older picture was taken before the half-cock was cut, and since then the front portion of the trigger was removed.


The lock now has half and full cock positions.


Next, the tang will be added.


IdeZilla

Tuesday, October 29, 2013

Lock of the Cherry Stocked Muzzle Loader

Here's some pictures of the unfinished lock.

It needs the left side plate and hammer stop block.
Sear spring fits around the trigger but not touching significantly.
Lock shown at half-cock.

 There is no trigger spring, yet.


 Full-cock below.


Side Plate is 1/8 inch thick, rear spring block is 1/4 inch thick and the two are riveted together. 8-32 tap for the hammer spring mounting screw. Spring is cut and made from an old handsaw blade. Sear is made from an old pair of worn out slip joint pliers, probably older than me. Sear spring fits into a hole in the hammer spring block and is music wire 0.040 inch diameter. There is a slight notch across the top of the sear to help keep the spring centered.
Hammer at rest or "just touching the nipple".
IdeZilla

Post comments if you would like more information, please.