Wednesday, November 13, 2013

A Prototype UnderHammer Lock

This is another type of underhammer lock.
It is similar to others that have been used with some slight differences.
Springs have not been inserted.
Now installed into "The Frontier" pistol.

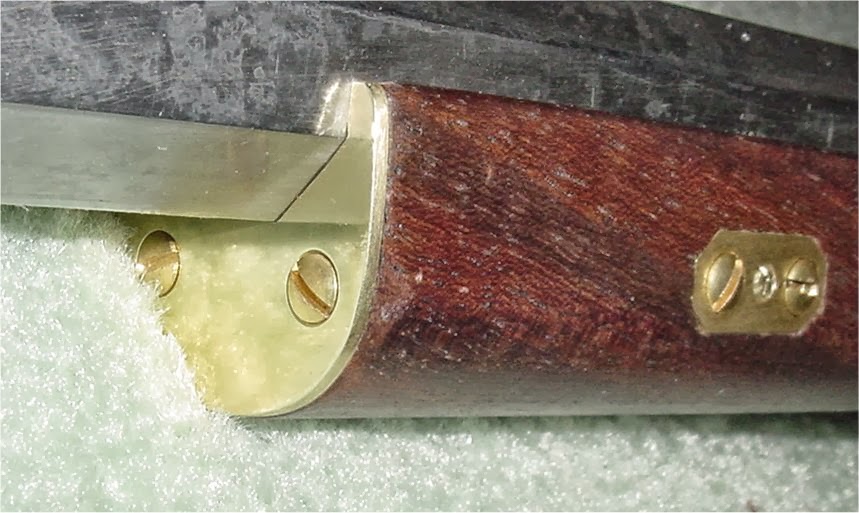
Lock is steel, common 1/8 inch thick plate, for testing the design. Rear two pins are 1/8 inch brass while the front pin is 0.203 inch diameter steel from my scrap pile.


The close up shows the hammer in full cock position with the sear being held by the trigger. No springs are shown yet. Pushing up on the hammer holds the lock tightly together. While pulling the trigger it is noted that there is very little force applied to the trigger by the sear. I note that the sear+trigger connection is visible outside of the lock, remember this is just a prototype. Normally the trigger and sear pins would be higher up hiding both.


This picture shows the hammer down, sear released, trigger pulled. The sear does not need to move more that pictured to release the hammer. Yes, the trigger shape is ugly and it will most likely be shortened.


The close up of the hammer down, etc. Red marker pen on the hammer shows the hammer and sear are not touching.

Lock serial number can be: P11132013.


Here are three more pictures, with springs.
Action at full cock, hammer spring under full tension. Trigger pull is nice and smooth.
Hammer spring is cut from an old rusty hand saw blade, tempered first.
Main spring block; 8-32 tap, soft soldered to back frame, it will be riveted later.
 The brass washers are temporary, used to space the parts up away from the frame and to have the hammer spring centered.

Trigger was reshaped.
Trigger spring is shaped like an "L". Sear spring is shaped like a "V".

As the trigger is pulled the rear of the sear moves down just a tiny amount. This should keep it locked if it gets dropped ;-)

There is some temporary brass tubing over the trigger and sear posts to hold the 2 springs in position.


IdeZilla

Comments Appreciated.

Friday, November 8, 2013

Shootable, but not finished

Yes, the stock is bulky, this is my preference. The barrel has a tang and is pinned.
1/8 inch diameter brass pin through the stock and the barrel lug. The lug is soldered to the barrel with low temperature silver bearing high strength plumbing solder.

Visible are the two barrel rear sight holes. Stock needs a nose cap. I have some Walnut pieces that would work nicely.


Here is that tang, tapered, flat, plain but sturdy. Plenty of room for a tang peep sight.


Action inlet and capping notch.


Now to tap the barrel for front and rear sights. Then off to the shooting range.


Rear and front sights added. Barrels pre-drilled holes were tapped 6-48 US. Taps came from Track-of-the-Wolf (.com)

Apologies for  fuzzy pictures (old cell phone camera).


Have not tried these sights. They are temporary to see how it shoots.


Walnut stock front cap, added; Nov/18/2013


Nov/19/2013
Old rusty military steel butt plate, formed (hammered profusely) to fit curve of stock then inlet.
How it looks today


Nov/20/2013
Brass flash cup added.


July/10/2016
Range time today.  Shoots great.  Used mattress ticking with a 0.440 inch RB, water lube.
Looks like this one will get lower front and (hopefully adjustable) rear sights.
Possibly add a hammer cup to keep those cap fragments away from my left forearm. (ouch).


IdeZilla

Comments appreciated.

Friday, November 1, 2013

Rifle Lock

A lock is mounted, a different lock. It comes from an unused pistol. This action is very smooth and works great. There was no happiness trying to make another lock design that was smooth and had an easy trigger pull.

Shown is half-cock. The barrel is inlet and has no tang and the tang will be added later. Possible the stock will have barrel bands instead of pins or wedges. Since the barrel is probably stainless steel it would be difficult to solder pin or wedge lugs to it.


Here is that lock with full-cock notch. Notice that this older picture was taken before the half-cock was cut, and since then the front portion of the trigger was removed.


The lock now has half and full cock positions.


Next, the tang will be added.


IdeZilla

Tuesday, October 29, 2013

Lock of the Cherry Stocked Muzzle Loader

Here's some pictures of the unfinished lock.

It needs the left side plate and hammer stop block.
Sear spring fits around the trigger but not touching significantly.
Lock shown at half-cock.

 There is no trigger spring, yet.


 Full-cock below.


Side Plate is 1/8 inch thick, rear spring block is 1/4 inch thick and the two are riveted together. 8-32 tap for the hammer spring mounting screw. Spring is cut and made from an old handsaw blade. Sear is made from an old pair of worn out slip joint pliers, probably older than me. Sear spring fits into a hole in the hammer spring block and is music wire 0.040 inch diameter. There is a slight notch across the top of the sear to help keep the spring centered.
Hammer at rest or "just touching the nipple".
IdeZilla

Post comments if you would like more information, please.

Sunday, October 20, 2013

Cherry Stocked Muzzle Loader

This is the beginnings of a .45 caliber, 1:28 twist, rifle project.

Some of these pictures would not fit into the cameras view so they are in pieces. Me standing on a chair to take pictures.

Here is what it looks like today.
Stock: Cherry
Barrel: Knight DISC remnant, purchased online from Green Mountain Barrels, internet specials. Needs tang.
Plug: 5/8-18 US thread, 6-line bolt.
Action: Underhammer, not done, full cock shown. Hammer spring not finished, spring needs trimming.


Right side of action panel.
Hammer and trigger. Trigger was cut out straight, hammered to make it wider, curled over vise screw.
None of these pieces are finished, just roughed out. Trigger spring visible.


Barrel came with a broken tap piece which was removed. I think this barrel is stainless steel, not sure.

IdeZilla


Please leave comments if you choose, thanks.

Friday, October 18, 2013

Front Brass Cap

Not much to report today, but a flat brass cap was added to the front of the stock. Changed brass screw types to slotted, seems to look better. Also, more of that applied mustard patterning is visible.


Last shot.

Some minor repairs to the rear sight as it shot to the left a bit and a ring was added to the rear sight.

The inside of the stock around the nipple needs bedding to keep the burning gasses from moving up between the stock and barrel, a pain to clean out each time.

IdeZilla

Wednesday, October 9, 2013

A Request, A Recycled Lock, more pictures added 10/10

Here are three older pictures of a lock. The hammer spring shown here was originally for a rifle.

Notice in previous posts that there is a new hammer spring and is now shaped for pistol finger clearance.
(See below, more pictures added)

The two 8-32 threaded upper holes in the back frame are for the longer flat head screws to mount this action into the stock. Trigger spring is "music wire" and is held in place by that notch/groove in the spring block and the right angle bend where it enters a hole in the trigger. The notches in the hammer are half and full cock notches. The half notch has been moved upward about 1/16 inch to enable the hammer head to be a bit closer to the nipple. Trigger and hammer have been hack sawed out of flat stock and several HF files have been worn out making these locks. This one is the easiest to make and get to work correctly. Note that the trigger pin axle is forward of the trigger sear ledge. This keeps the trigger and hammer locked together.


Also note that (in newer pictures) the action frame has been reshaped (greatly trimmed down) across the top. The rear spring mounting block has been riveted to the back frame piece using nails (about 1/8 inch diameter or so).

Here is another old picture with the side plate screwed down. 8-32 stock mounting screws are in the background.


Other side of the action. Shows the stock mounting holes.


 A mockup of what the lock looks like outside the stock.
A closer look

IdeZilla

Range Report, Oct 9

Here is that target, sitting as it was hanging at the range.  Started shooting at the center of the page, just to see what is going on.  All of the paper target hits were me getting used to how it shoots and trying to find out where it hits with the current sight settings.  Slowly changing rear sight elevation upwards as the pistol was shooting too low.

Then the orange target was used.
Last two hits are in the orange diamond's center, next to each other, left then right.

Looks like it's a shooter and not a safe queen.

The grip could be slightly modified smaller as its still a bit big.
It needs a loading stand.

IdeZilla
https://sites.google.com/site/onlyonsaturdaynight/

Добро пожаловать
Прошу
Witaj
Vítej
dobrodošli

ยินดีต้อนรับ
 Benvenuti
환영 합니다


Grip Changed.


IdeZilla
Comments Desired

Tuesday, October 8, 2013

Changed the grip

The grip shape was not working, to difficult to hold steadily. Wood was added to the back and reshaped. This grip shape is much easier to hang on to and my trigger finger does not support this pistol.

Then some mustard was applied on the barrel to obtain random patterns in the metal.
It is faint in this picture but definitely has a nice random pattern. If it wears off, there's more mustard in the fridge.


IdeZilla

Monday, October 7, 2013

Rear Sight, cleaned up.

Here is that rear sight cleaned up a bit
There is now a slight dovetail on the right edge of that elevator. Just enough to keep the elevator from wobbling.

You may notice that all of these rear sight pieces are soldered together, even the base elevator guides.


The stock is now sporting it's first coat of finish.


Now off to the range!


More Pictures:
http://idezilla.blogspot.com/2014/02/brass-rear-sight-up-close.html

IdeZilla