Friday, October 18, 2013

Front Brass Cap

Not much to report today, but a flat brass cap was added to the front of the stock. Changed brass screw types to slotted, seems to look better. Also, more of that applied mustard patterning is visible.


Last shot.

Some minor repairs to the rear sight as it shot to the left a bit and a ring was added to the rear sight.

The inside of the stock around the nipple needs bedding to keep the burning gasses from moving up between the stock and barrel, a pain to clean out each time.

IdeZilla

Wednesday, October 9, 2013

A Request, A Recycled Lock, more pictures added 10/10

Here are three older pictures of a lock. The hammer spring shown here was originally for a rifle.

Notice in previous posts that there is a new hammer spring and is now shaped for pistol finger clearance.
(See below, more pictures added)

The two 8-32 threaded upper holes in the back frame are for the longer flat head screws to mount this action into the stock. Trigger spring is "music wire" and is held in place by that notch/groove in the spring block and the right angle bend where it enters a hole in the trigger. The notches in the hammer are half and full cock notches. The half notch has been moved upward about 1/16 inch to enable the hammer head to be a bit closer to the nipple. Trigger and hammer have been hack sawed out of flat stock and several HF files have been worn out making these locks. This one is the easiest to make and get to work correctly. Note that the trigger pin axle is forward of the trigger sear ledge. This keeps the trigger and hammer locked together.


Also note that (in newer pictures) the action frame has been reshaped (greatly trimmed down) across the top. The rear spring mounting block has been riveted to the back frame piece using nails (about 1/8 inch diameter or so).

Here is another old picture with the side plate screwed down. 8-32 stock mounting screws are in the background.


Other side of the action. Shows the stock mounting holes.


 A mockup of what the lock looks like outside the stock.
A closer look

IdeZilla

Range Report, Oct 9

Here is that target, sitting as it was hanging at the range.  Started shooting at the center of the page, just to see what is going on.  All of the paper target hits were me getting used to how it shoots and trying to find out where it hits with the current sight settings.  Slowly changing rear sight elevation upwards as the pistol was shooting too low.

Then the orange target was used.
Last two hits are in the orange diamond's center, next to each other, left then right.

Looks like it's a shooter and not a safe queen.

The grip could be slightly modified smaller as its still a bit big.
It needs a loading stand.

IdeZilla
https://sites.google.com/site/onlyonsaturdaynight/

Добро пожаловать
Прошу
Witaj
Vítej
dobrodošli

ยินดีต้อนรับ
 Benvenuti
환영 합니다


Grip Changed.


IdeZilla
Comments Desired

Tuesday, October 8, 2013

Changed the grip

The grip shape was not working, to difficult to hold steadily. Wood was added to the back and reshaped. This grip shape is much easier to hang on to and my trigger finger does not support this pistol.

Then some mustard was applied on the barrel to obtain random patterns in the metal.
It is faint in this picture but definitely has a nice random pattern. If it wears off, there's more mustard in the fridge.


IdeZilla

Monday, October 7, 2013

Rear Sight, cleaned up.

Here is that rear sight cleaned up a bit
There is now a slight dovetail on the right edge of that elevator. Just enough to keep the elevator from wobbling.

You may notice that all of these rear sight pieces are soldered together, even the base elevator guides.


The stock is now sporting it's first coat of finish.


Now off to the range!


More Pictures:
http://idezilla.blogspot.com/2014/02/brass-rear-sight-up-close.html

IdeZilla


Saturday, October 5, 2013

Rear Sight added

A elevation type of rear sight has been attached. It is crude and needs cleaning up, but at 100ft (or so) it is sighted in. Final shaping will take place as it gets used. The thumb nut stud will be clipped off. The brass base is soldered to the tang, can be removed if needs be. The elevator is held in place with the brass thumb nut. A piece of hexagonal tube was soldered on and sighted in for windage.


Here is a side view.


And another left side view showing the single calibration scratch.

The right side lifts outward ever so slightly when the thumb nut is tightened. For this one, the brass elevator can be upset and a tiny dovetail could be added to the base.


Off angle front view.

IdeZilla

Thursday, October 3, 2013

More on "Just Another"

Today, this much was accomplished.
Barrel is now tanged, screwed in and pinned.
Grip shaping starting to appear.
Action mounted.
The front sight is on backwards, you say? Easily fixed, turn it around or just make another.


Action has had some work done, lowering the half-cock position (shown).
Stock shape is still not finalized. It may just get tapered back to front with enough left for a ramrod.
Not sure what to do with that slight hump at the rear.

Here is a fuzzy picture of the tang. Two 8-32 screws hold the tang to the plug while the brass screw holds the tang to the stock. Front edges of the tang have been shaped to match the barrel contour.

Looking for adjustable rear sight ideas.

I just hope that all of this work pays off with a shoot-able pistol.

The hammer spring has been tapered (width) being narrower at front and wider at the trigger. This keeps the hammer spring from intruding into the knuckle or grip area.

IdeZilla

Monday, September 30, 2013

Just another .45 cal muzzle loading underhammer

Started this one yesterday with an unused lock.
First a new spring was needed in a different shape to clear my knuckles, that was reshaped yesterday. Then this project needed some wood for the stock, luckily there was a Walnut blank big enough for this project in the wood pile.


Here in this first picture, is seen a beginning mockup. There is room for the knuckles behind the hammer spring. The two holes in the stock are to mount the lock. Extra wood was left on the stock until the final shape is "figured out".

Nipple is in the pocket just above the hammer head.
Barrel is almost done for the inlet and is the last pistol sized piece in the .45 cal pile.
Next: Making the barrel tang out of 3/16 inch stock.


Blocks for Round Balls

I was wanting something to keep those round balls from moving all over the shooting bench.
Beginning with a small piece of Walnut, several holes at 3/8 inch (dimples) for .490 round balls. Shown in the first picture are five of those round balls in a larger block.  The smaller block shows five holes and seven holes. The larger block has staggered hole spacing for fingers to easily grasp those round balls and the holes are about 1 inch apart.

Next pictured are six .375 conicals in the smaller block. This block has on three of its sides different count of holes. 5, 6, and 7. As seen in the second picture, there are six holes on top and seven holes at the front side. These blocks have one coat of finish. The larger block is 1/2 inch thick by about 8.5 inches long and the smaller block size is 1 inch square by about 4.5 inches long.

Sunday, September 1, 2013

Wood Lock - in progress

Starting with the book, "The Underhammer Rifle" by Jeff Baron.

I wanted to make a copy of one of the books images, a "Wood Lock".

I began by re-drawing it in CADSTD just to see if the geometry is correct. I could not seem to understand how that particular design would lock up, so I continued anyway. I cut out the hammer and trigger and pinned them to a piece of Maple scrap with brass pins.
Unfortunately the first trigger showed me that what I cut out would not lock up in full cock. The hammer just pushed the trigger out of the way. So, I cut out another trigger, this one pictured, and moved the trigger pin closer and higher up so that the trigger ledge is in front of the trigger pin. A slow pulling of the trigger shows that the hammer moves downward ever so slightly, this is good I presume.
Here is a close up of the lockup. It appears that the locking area is too deep, but the trigger swings out of the way very nicely.


I have formed the hammer spring out of an old hand saw blade. I annealed the top strap area, cut out a 1/2 inch wide piece about 6 inches long. Then annealed it again to make it nice and soft for the forming.
Here is that spring, partially formed. Since it's still really warmish here in Phoenix area, I may wait to temper the spring in the bar-be-que.


Update: 9/30/2013
After playing with this lock type, It will be relegated to the "tried this one" pile. Or in other words, it may get redone at a later date, just not now.
IdeZilla.

Sunday, May 26, 2013

Underhammer Pistol, in progress

This frame was sent to me by a person (I forget) from www.garagegunsmithing.com (closed for repairs). The barrel, trigger, hammer and other parts have been cut out and then added. Hammer spring is from the hardware store and was intended to be a screen door spring. Barrel is from a DP Enfield .303 stub. Barrel total length is 6 inches long while the top portion of the frame is 4 inches long.

 Here are the internal parts, trigger attached to the frame with a 1/8 inch brass pin. Hammer has a low-temp silver soldered cup. The barrel and it's stub have been roll pinned vertically and low-temp silver soldered to the frame, it should not come off. The action has only a full cock position, no safety position. A wooden "H" is to be made to insert between the barrel and the hammer to hold the hammer in a safety position.
 Shown is the hammer all the way closed as in a "popped cap" position. Yes, there is a brass washer under the nipple, the threaded portion of that nipple is a bit long and protruded into the chamber area. This protrusion would keep the cleaning behind it troublesome.

Pulling the hammer down will release that "H" and have it fall away. Pulling down in the front of the hammer will set the action to full cock as shown here. The hammer cup has a split at the front to help in digging out a spent cap. Trigger and hammer are cut and shaped out of 1/8 inch hot rolled steel.
There are three 6-32 threaded holes to mount the two wood side panels to the frame. The side panels or grips have been band sawed out of the selected wood and are awaiting finishing. They will cover the frame completely all the way up to the rear of the barrel. Front and rear sights have not been decided upon.

That's all for now.

IdeZilla


Barrel changed, Jan/13/2014
.50 cal, 1:28 twist.
Back 10 inch portion of a barrel.
Purchased at "internet specials" from G.Mountain barrels while they were available.
Front heavy.  :-)


Jan/27/2014
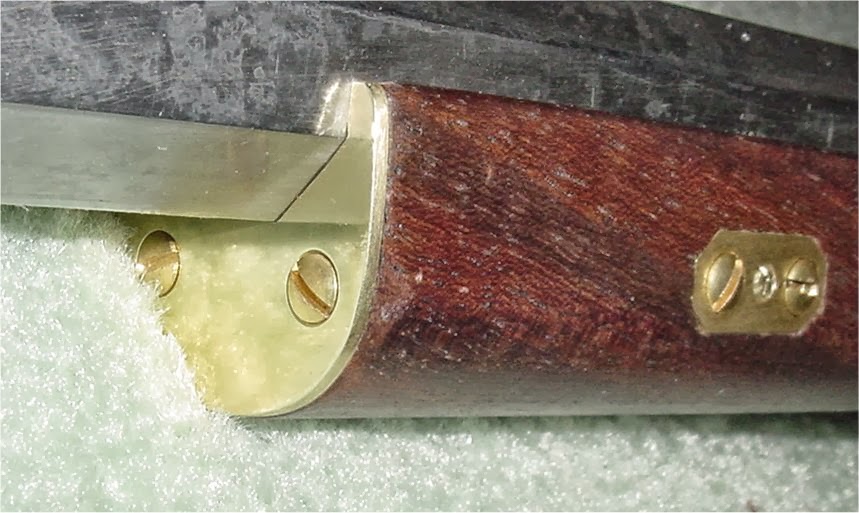
New grips fitted, shaping in progress. The wood looks like Padauk.

IdeZilla


Jan/30/2014
Front and rear sights added.
 How it looks today.
Brass Plate on top of the frame, 22LR case as rear peep sight.
Top view.
Rear mounting screw hole is slotted to allow for very slight windage adjustments. Needs cleaning and polishing.
Front peep made from multiple sizes of brass tubing all soldered together. Faint line on the barrel top is made by putting a balance bubble on a file and gently sliding the file on the barrel.

IdeZilla


Jan/31/2014
Range Report
11 meters, .490 RB, 30gr of 777 FFFg, blue pillow ticking patch lubed with bore butter.
It hurts to shoot this one as the rear of the grip is still square and  a bit small.

First target at the bottom, second target at the top. 10 shot groups both targets.

IdeZilla


Feb/10/2014
Second Range Report.
11 meters, .490 RB, 30gr of 777 FFFg, blue pillow ticking patch lubed with bore butter.
About 12 or 15 shots ( I lost count :-) with POA at red dot.

IdeZilla

Yup, another shooter.


Notes:
The pistol grip has been thickened on the right side and a thumb rest has been added on the left side. This modification has helped in removing the pain in shooting this pistol.


That single hole up at the top between "1L" and "2L" is from a 7.35x52mm Carcano 1938 [SA] barreled rifle.


Feb/11/2014
Showing how the "safety" or half-cock works.
 Top view, how the grip has changed.
Left Side.
The "H" block holding the hammer in half-cock position for capping.
Right side.
Hammer filing on bottom, for looks.

IdeZilla